在uni-app中,美化对话框通常意味着自定义对话框的样式,因为uni-app内置的对话框API(如uni.showModal)提供的样式较为基础,可能不满足所有设计需求。以下是一些步骤和技巧,用于在uni-app中自定义并美化对话框:
1. 自定义对话框组件
创建组件
在项目的
components目录下创建一个新的Vue组件,比如命名为CustomDialog.vue。在
CustomDialog.vue中编写模板、样式和脚本。模板部分(
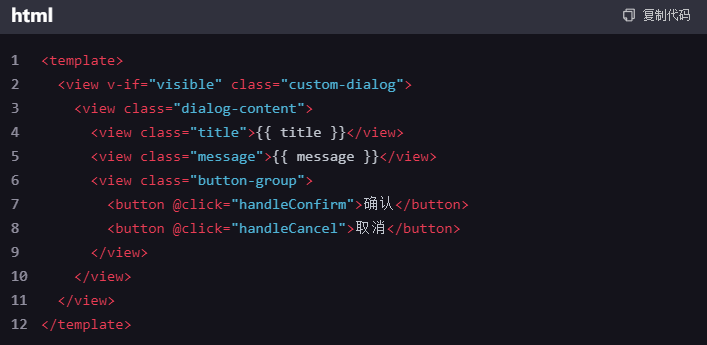
template):- <template>
<view v-if=”visible” class=”custom-dialog”>
<view class=”dialog-content”>
<view class=”title”>{{ title }}</view>
<view class=”message”>{{ message }}</view>
<view class=”button-group”>
<button @click=”handleConfirm”>确认</button>
<button @click=”handleCancel”>取消</button>
</view>
</view>
</view>
</template> - 样式部分(
style): - <style scoped>
.custom-dialog {
position: fixed;
top: 50%;
left: 50%;
transform: translate(-50%, -50%);
background-color: #fff;
border-radius: 8px;
box-shadow: 0 2px 12px rgba(0,0,0,0.1);
padding: 20px;
z-index: 1000; /* 确保对话框在顶层显示 */
}
.dialog-content {
text-align: center;
}
.title, .message {
margin-bottom: 10px;
}
.button-group button {
padding: 8px 16px;
margin: 0 5px;
border: none;
background-color: #007aff;
color: #fff;
border-radius: 4px;
cursor: pointer;
}
/* 添加更多样式以符合你的设计需求 */
</style> - 脚本部分(
script): - <script>
export default {
props: {
title: String,
message: String,
visible: {
type: Boolean,
default: false
}
},
methods: {
handleConfirm() {
this.$emit(‘confirm’);
this.close();
},
handleCancel() {
this.$emit(‘cancel’);
this.close();
},
close() {
this.$emit(‘update:visible’, false);
}
}
}
</script> 使用组件
在你的页面中,你可以这样引入并使用
CustomDialog组件:- <template>
<view>
<button @click=”showDialog”>显示对话框</button>
<custom-dialog
:title=”‘确认操作'”
:message=”‘你确定要继续吗?'”
:visible.sync=”dialogVisible”
@confirm=”handleConfirm”
@cancel=”handleCancel”
></custom-dialog>
</view>
</template><script>
import CustomDialog from ‘@/components/CustomDialog.vue’;export default {
components: {
CustomDialog
},
data() {
return {
dialogVisible: false
};
},
methods: {
showDialog() {
this.dialogVisible = true;
},
handleConfirm() {
console.log(‘用户点击了确认’);
this.dialogVisible = false;
},
handleCancel() {
console.log(‘用户点击了取消’);
this.dialogVisible = false;
}
}
}
</script>2. 使用UI框架
如果你不想从头开始编写对话框组件,可以考虑使用uni-app的UI框架,如uView、Vant Weapp等。这些框架通常提供了丰富的对话框组件,并且支持自定义样式。你可以按照框架的文档来引入和使用对话框组件,并通过修改样式类来调整对话框的外观。
3. 注意事项
- 确保对话框的`
© 版权声明
文章版权归作者所有,未经允许请勿转载。
相关文章

暂无评论...